

An Email Says More Than You Think
When you receive an email, what you see are the sender's name, subject, and content. But behind this visible interface, every email carries a complete technical document, recording every stage from its creation to its arrival. This document is called the email header, which contains where the email was initially sent from, the mail servers it relayed through, the time each relay occurred, and various technical authentication statuses. The sender's name and address are fields that anyone can forge. However, the IP addresses and server records in the email header are much harder to spoof, making them an effective tool for determining whether an email genuinely comes from the claimed source.
How to View Email Headers on Different Platforms
Gmail 1. Open the target email. 2. Click the three-dot menu icon in the upper right corner. 3. Select 'Show Original'. 4. A new window will display the complete original email content, including the header. Gmail also offers a user-friendly header analysis tool, which provides a 'Copy to Clipboard' option at the top of the original email page, allowing you to copy the header content and paste it into Google's Admin Toolbox header analysis page, found at toolbox.googleapps.com/apps/messageheader. This tool will parse the header into a more readable format. Outlook Web Version 1. Open the target email. 2. Click the three-dot menu in the upper right corner. 3. Select 'View Email Source' or 'Mail Options'. 4. In the pop-up window, you can see the complete Internet header. Outlook Desktop Version 1. Double-click the email to open it in a separate window. 2. In the ribbon, select 'File', then click 'Properties'. 3. In the Internet headers field, you will see the complete header. Apple Mail 1. Select the target email. 2. In the menu bar, select 'View', then 'Message', and finally 'All Headers'. 3. Complete header information will appear at the top of the email.
What Key Information is in the Header?
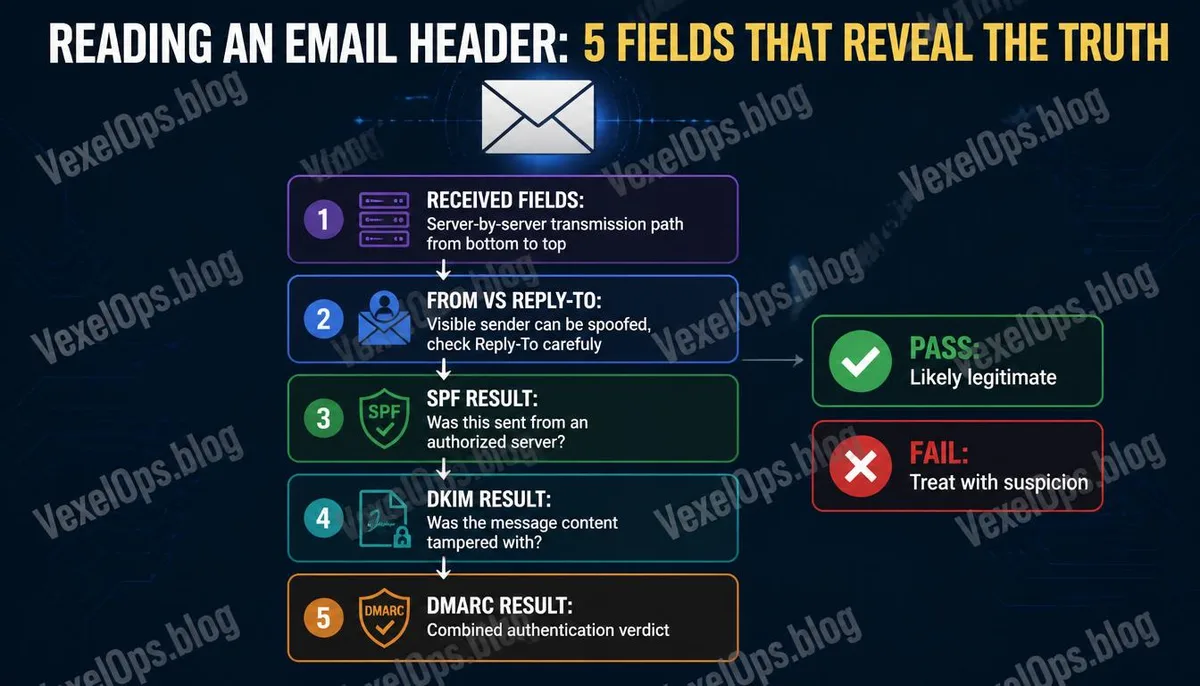
Once you have the header content, the following fields are the most important bases for judgment. Received Field Typically, there are multiple Received fields in the header, each representing a server node the email passed through. The reading order is from bottom to top, with the bottommost Received indicating where the email was initially sent from, and the topmost being the last relay, which is the node your mail server received the email from. Each Received field usually contains the server's domain name and IP address, as well as the time of this relay. If an email claims to be from PayPal, but the bottommost Received field displays an IP address that points to a server entirely unrelated to PayPal, this inconsistency is a clear red flag. From and Reply-To Fields The From field shows the address visible at the sender's location, which can be fabricated at will. The Reply-To field indicates the address the email will actually be sent to when you hit reply; some phishing emails will spoof the From field to appear as an official address while setting the Reply-To to an email controlled by the attacker, inadvertently forwarding your information back to them when you
Using Tools to Analyze Headers More Intuitively
Manually reading raw headers can be quite tedious for most people. There are several free online tools that can parse headers into a more understandable format. MXToolbox Email Header Analyzer URL: mxtoolbox.com/EmailHeaders.aspx Paste the header content here, and MXToolbox will present each Received node as a visualized transmission path, clearly displaying each hop's IP address, server name, timestamp, and authentication results. Google Admin Toolbox Message Header URL: toolbox.googleapps.com/apps/messageheader This header analysis tool provided by Google presents the analysis results in a timeline format, making it especially useful for analyzing emails received in Gmail. Mail Header Analyzer by WhatIsMyIPAddress URL: whatismyipaddress.com/tools/mail-header-analyzer This tool also offers header parsing and provides geographical location queries for each IP address, allowing you to see intuitively where the email originated from in which country and city.
Common User Questions about Email Header Analysis
Can’t I Rely on Just the Sender's Address That Appears to be an Official Domain?
No, and this is precisely the most important use case for email header analysis. The SMTP protocol is designed to allow anyone to fill in any address in the From field without any verification, making it very easy to forge sender addresses. Just because you see [email protected] or [email protected] in your inbox doesn’t mean the email truly comes from PayPal or Apple’s servers. To confirm whether the email really originated from the claimed organization, you need to check the Received and Authentication-Results fields in the header, especially the SPF and DKIM verification results, which are much harder to spoof than the From field itself.
If Both SPF and DKIM Pass, Is the Email Definitely Genuine?
Passing SPF and DKIM verification means the email was indeed sent from a server authorized for that domain and that the content wasn't altered during transmission. This provides a strong technical assurance, significantly raising the difficulty of email forgery. However, this doesn't guarantee that the email's content is trustworthy; an attacker could create a domain looking similar to the target domain, such as paypa1.com or paypal-secure.com, set up full SPF and DKIM records for that domain, and then send phishing emails that pass all verifications. Authentication results must be carefully cross-referenced with verification of the domain itself; both elements are necessary.
What Should I Do If an Email's Header Shows It Comes from a Suspicious IP?
First, do not click on any links in the email, do not download any attachments, and do not reply. Record the full header and the suspicious IP information from the email—these details will be needed when reporting to the relevant authorities or your email service provider about spam. If the email impersonates a specific brand or organization, you can report it through the official channels of that organization; most large companies have dedicated phishing email reporting addresses. Gmail users can report phishing directly in the mail interface, and Outlook also provides a built-in reporting mechanism. These reports help email service providers quickly identify and block similar attacks.
One Key Takeaway: The email header is the true identity card of an email, not the sender's name that can be filled in arbitrarily. Learning to view and interpret the Received field and authentication results in the header is the most direct technical way to identify spoofed emails.